
- HOME
- OPINION
- ON GROUND
- INTERVIEW
- IPL 2026
- INDIA
- NewsGram USA
- WORLD
- न्यूजग्राम
- POLITICS
- ENTERTAINMENT
- CULTURE
- LIFESTYLE
- ECONOMY
- SPORTS
- Jobs / Internships
- Misc.
- NewsGram Exclusive
By Zafar Jutt
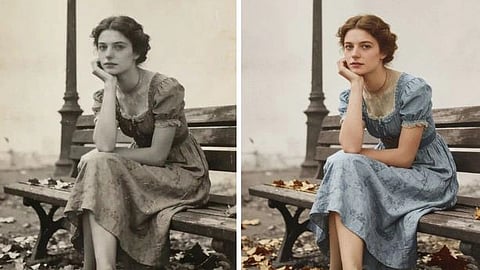
Remember those 90s film photos? They have a certain magic, a warmth that modern digital pictures often miss. But they also have their flaws, like soft focus and a bit of blur. While trying to fix them, you might run into a new problem: the "waxy AI" effect. Many tools over-process images, leaving faces looking like plastic dolls and erasing the natural film grain we love.
Restoring these photos isn't about making them look like they were taken on a brand new smartphone. It’s about gently enhancing them to bring back the details you remember. You can sharpen blurry images and restore clarity without sacrificing the authentic texture of the original photograph. It’s possible to make old photos clear again while preserving their nostalgic soul.
Sharpening vintage photos serves more than just a technical purpose. It breathes life back into cherished memories. Let's look at a few common situations where bringing a little clarity can make a huge difference.
Every family has them. Stacks of photo albums filled with birthdays, holidays, and goofy candid moments from decades past. The photos are precious, but when you scan them, you notice how many are just slightly out of focus. A face in the background is blurry, the text on a birthday cake is unreadable, or a special moment is just a little too soft.
The goal here is preservation. By carefully sharpening these images, you can bring faces into focus, making it easier to see the expressions of loved ones. Restoring these details ensures that when you share these photos with younger generations, the memories are clear and impactful. A properly enhanced photo can be archived digitally and shared online, protecting it from physical decay while making the moment feel present again.
Think back to a concert or festival you attended in the 90s. You probably used a disposable or simple point-and-shoot film camera. The lighting was poor, the action was fast, and the resulting photos are often a blurry, grainy mess. Yet, these images hold the raw energy of a moment that meant the world to you. They are irreplaceable.
Instead of leaving them buried on a hard drive, you can restore them. The aim isn't to create a perfectly crisp image, as that would be impossible and look fake. The objective is to reduce the motion blur just enough to distinguish the performers on stage or to clarify the faces of friends in the crowd. A gentle sharpening can turn a nostalgic but unusable photo into a powerful throwback you can proudly post and share, sparking conversations with others who were there.
For photography enthusiasts, scanned film negatives are a treasure trove. Negatives hold much more detail than old prints, but the scanning process itself can result in a soft digital file. If you want to print one of these images, especially in a larger format, that softness becomes very noticeable. The photo will lack punch and appear dull.
Here, the use case is about achieving print-quality results. By applying a precise sharpening algorithm, you can enhance the fine details captured in the original negative. This process can bring out the texture in clothing, the details in a landscape, or the sharpness of a subject's eyes. This allows you to create beautiful, high-quality prints for framing or for a portfolio, giving your old film work a new, professional life.
When done correctly, sharpening does more than just make a photo look better. It unlocks hidden value in each image.
* For Family Albums: The primary benefit is emotional clarity. You're not just fixing a blurry photo, you're preserving a legacy. Faces become recognizable, details of the past reappear, and the story within the picture becomes easier to read and share. It strengthens family connections across generations.
* For Event Photos: The main advantage is usability. A blurry photo often stays hidden. A sharpened one gets shared, commented on, and enjoyed. It transforms a forgotten digital file into a vibrant, active memory that can reconnect you with past experiences and old friends.
* For Scanned Negatives: The benefit is tangible quality. You gain the ability to produce stunning physical prints from your old work. It respects the original craft of film photography by preparing it for modern display, ensuring your best shots can be appreciated offline in the real world.
Avoiding the "waxy" look is all about using the right approach and the right tools. The key is subtlety. Here’s a simple workflow to guide you.
Your restoration is only as good as your starting file. If you're scanning a physical photo, clean it carefully with a soft cloth to remove dust. Use a high-resolution scanner and set the DPI (dots per inch) to at least 600 for standard prints. If you have the original negatives, scanning them will always produce a superior result with more detail to work with.
Many generic enhancers use aggressive algorithms that smooth over details to reduce noise, which results in that fake, plastic look. You need a specialized tool designed for clarity without sacrificing authenticity. An intelligent tool can help you Unblur Image by focusing on edges and details rather than smearing pixels. These tools analyze the photo and apply sharpening exactly where it's needed, preserving natural film grain and skin texture.
This same principle applies to old home videos from VHS or Camcorder tapes. A dedicated Video Enhancer can improve clarity and resolution in moving footage, restoring precious family moments that were captured on tape. The goal is the same: enhance, don't erase.
Once you've uploaded your photo to a tool like UnblurImage AI, start with the lowest enhancement setting. The goal is to correct the blur, not to create an unnaturally sharp image. Look closely at the preview. Are the faces clearer? Can you see details that were soft before? Avoid pushing the sharpness so far that you see bright outlines, or "halos," around objects.
A good technique is to toggle between the "before" and "after" views. The change should be noticeable but not jarring. It should look like a better version of the original photo, not a completely different one. If the texture of a sweater or the grain in the sky starts to disappear, you have gone too far.
After sharpening, you may want to make other small adjustments. A slight increase in contrast can make the image pop, or a minor color correction can fix fading from the original print. Once you are happy with the result, save a new version of the file. Always keep your original scan untouched so you can go back to it if needed.
Restoring your 90s film photos is a rewarding process that reconnects you with your most important memories. The key is to reject the overly processed, artificial look that many modern tools produce. By focusing on a subtle, gentle approach, you can sharpen details and correct blur while celebrating the authentic charm of the original film. Choose your tools wisely and always prioritize the natural texture that makes these photos special. With a little care, you can bring your favorite moments back into focus for many years to come.
Suggested Reading:
Subscribe to our channels on YouTube and WhatsApp
Download our app on Play Store
